Deployment
Aiviro offers several deployment options to suit different needs, from local development and testing to a full-scale, orchestrated production environment. This guide covers the main deployment methods:
Local deployment: Ideal for writing and testing scenarios on your local computer.
Server deployment: For production or shared environments, Aiviro can be run on a server with its orchestration system. This integration is powered by Prefect, which provides a robust platform for scheduling, orchestrating, and monitoring your automation flows.
CI/CD Integration: Aiviro scenarios can be easily run within a Continuous Integration pipeline (e.g., GitLab CI, GitHub Actions) to automate testing and execution, for instance, by using a test runner like pytest.
Local deployment
Running Aiviro locally on your computer is the ideal approach for developing, testing, and debugging your automation scenarios. It allows you to see the automation run in real-time on your own machine without the need for a server setup.
To run a scenario locally, you just need to execute its main Python script using your Python interpreter.
Server deployment
Since version 3.35.0 we deprecated support for Prefect v1 and its deployment.
Please consider migration to Prefect v3, see Migration from Prefect v1 to v3 for more information.
Migration from Prefect v1 to v3
Migrating from Prefect v1 to Prefect v3 involves a new server setup and changes to how flows are defined and managed.
Important
Historical data from Prefect v1 cannot be migrated to Prefect v3. The v3 server uses a new database schema, and there is no direct path for transferring flow run history.
Recommended Migration Strategy
To ensure a smooth transition and avoid downtime, we recommend a parallel setup:
Set up the new v3 deployment (server and workers) following the Deploy Instructions instructions below. This will run completely separately from your existing v1 setup.
Migrate and register your flows for v3.
Thoroughly test your flows on the new v3 deployment to ensure everything works as expected.
Once you have confirmed v3 is stable, you can decommission your old Prefect v1 deployment.
Key Changes
Folder Structure: The new deployment stores all its data (database, logs, etc.) in a new, separate directory named
prefect-v3-data. This prevents any conflicts with your old installation.Flow Definition: You must create new flow scripts compatible with Prefect v3. You can use our CLI to scaffold a new flow file in your project:
aiviro-cli create prefect-v3-flow --flows-folder flows/ --scenario-script src/scenario_01/main_scenario_01.py --flow-name your-flow-name
New Concepts: Prefect v3 introduces new concepts like Deployments, Work Pools, and Work Queues, along with a redesigned UI. These new features offer more powerful and flexible orchestration. All of these concepts are described in detail in the following sections.
Deploy Instructions
Note
This uses our windows installer which prepares the environment and registers services to Windows.
If you want to manage the installation yourself use information in 🐍 Python tab.
Important
You have to have administrator priviliges to run the installer
Connect to your Windows server and run the installer from LINK_TO_AIVIRO_COM
On the Access credentials page provide the values we issued for your installation:
Client ID and API key — your Aiviro licence credentials.
Git repository — the URL of the flow repository the worker clones and keeps up to date.
You can type them in, or click Load credentials from file and select the
.inifile we provided. The file uses an[Auth]section:[Auth] ClientID=<your-client-id> ApiKey=<your-api-key> GitRepo=<url-of-your-flow-repository>
A template is available here:
credentials templateYou can change the location where the installer stores the program or data, but it has to be accessible via the system. It is not recommended to change these.
Default install location is
C:\Program Files\AiviroOrchestrationDefault data location is
C:\ProgramData\AiviroOrchestration
Important
Do not set it to any location owned by a user because there could be permission issues.
Once the installation finishes, the server and worker will be started and set to always restart.
You can manage them using
services.msc, which provides options to start, stop and restart the services. The services we use have these namesAiviroOrchestrationServer- Orchestration server with web interfaceAiviroOrchestrationWorker- Worker which runs the deployments
Connect to your server & go to the directory where you want to deploy Aiviro.
mkdir -p projects/aiviro  # create a new directory
cd projects/aiviro  # go to the directory
Create and activate a python virtual environment.
python3 -m venv venv  # create a virtual environment
source venv/bin/activate  # activate the virtual environment
Install Aiviro with Prefect extra dependencies.
pip install -i https://pypi.aiviro.com aiviro
Deploy Aiviro orchestration server. It contains server, database and web interface.
# deploying server with the default settings
aiviro-cli deploy server-v3 start --detach

# deploying server with other working directory
aiviro-cli deploy server-v3 start --work-dir /path/to/your/workdir --detach

# for additional information about deployment of the server, use --help option
aiviro-cli deploy server-v3 start --help
Deploy Aiviro Prefect worker.
# deploying worker with the default settings
aiviro-cli deploy worker start --worker-name <your-worker-name> --git-url https://<token-name>:<token>@<your-repo-url>.git --detach

# for additional information about deployment of the worker, use --help option
aiviro-cli deploy worker start --help
Add aiviro configuration file and set API credentials.
aiviro-cli config login --client-id <your-client-id> --api-key <your-api-key> --output prefect-v3-data/<worker-name>/volume/
Connect to your server via ssh.
Go to the directory where you want to deploy Aiviro. We recommend creating a new directory for it.
mkdir -p projects/aiviro  # create a new directory
cd projects/aiviro  # go to the directory
Create and activate a python virtual environment.
python3 -m venv venv  # create a virtual environment
source venv/bin/activate  # activate the virtual environment
Install Aiviro with Prefect extra dependencies.
pip install -i https://pypi.aiviro.com aiviro[prefect]
Deploy Aiviro orchestration server. It contains server, database and web interface.
# deploying server with the default settings
aiviro-cli deploy server start --detach

# define ip address for GraphQL backend to which frontend will connect
aiviro-cli deploy server start --server-host <your-ip-address> --detach

# for additional information about deployment of the server, use --help option
aiviro-cli deploy server start --help
Deploy Aiviro agent.
# deploying agent with the default settings
aiviro-cli deploy agent start --agent-name <your-agent-name> --git-url <repo-url-with-access-token> --label rdp --max-flows 1 --detach

# deploying agent with custom prefect project name
aiviro-cli deploy agent start --project-name <prefect-project-name> ...

# deploying agent with multiple environments, use --label and --max-flows options multiple times
aiviro-cli deploy agent start --agent-name <your-agent-name> --git-url <repo-url-with-access-token> --label <env-1> --max-flows 1 --label <env-2> --max-flows 1 --detach

# for further information about custom deployment of the agent, use --help option
aiviro-cli deploy agent start --help
Add aiviro configuration file and set API credentials.
aiviro-cli config login --client-id <your-client-id> --api-key <your-api-key> --output prefect-data/<agent-name>/volume/
Open the web interface in your browser, default url is http://localhost:8080. Select the
Flowtab,Hello Worldflow and run it, in order to validate your installation.
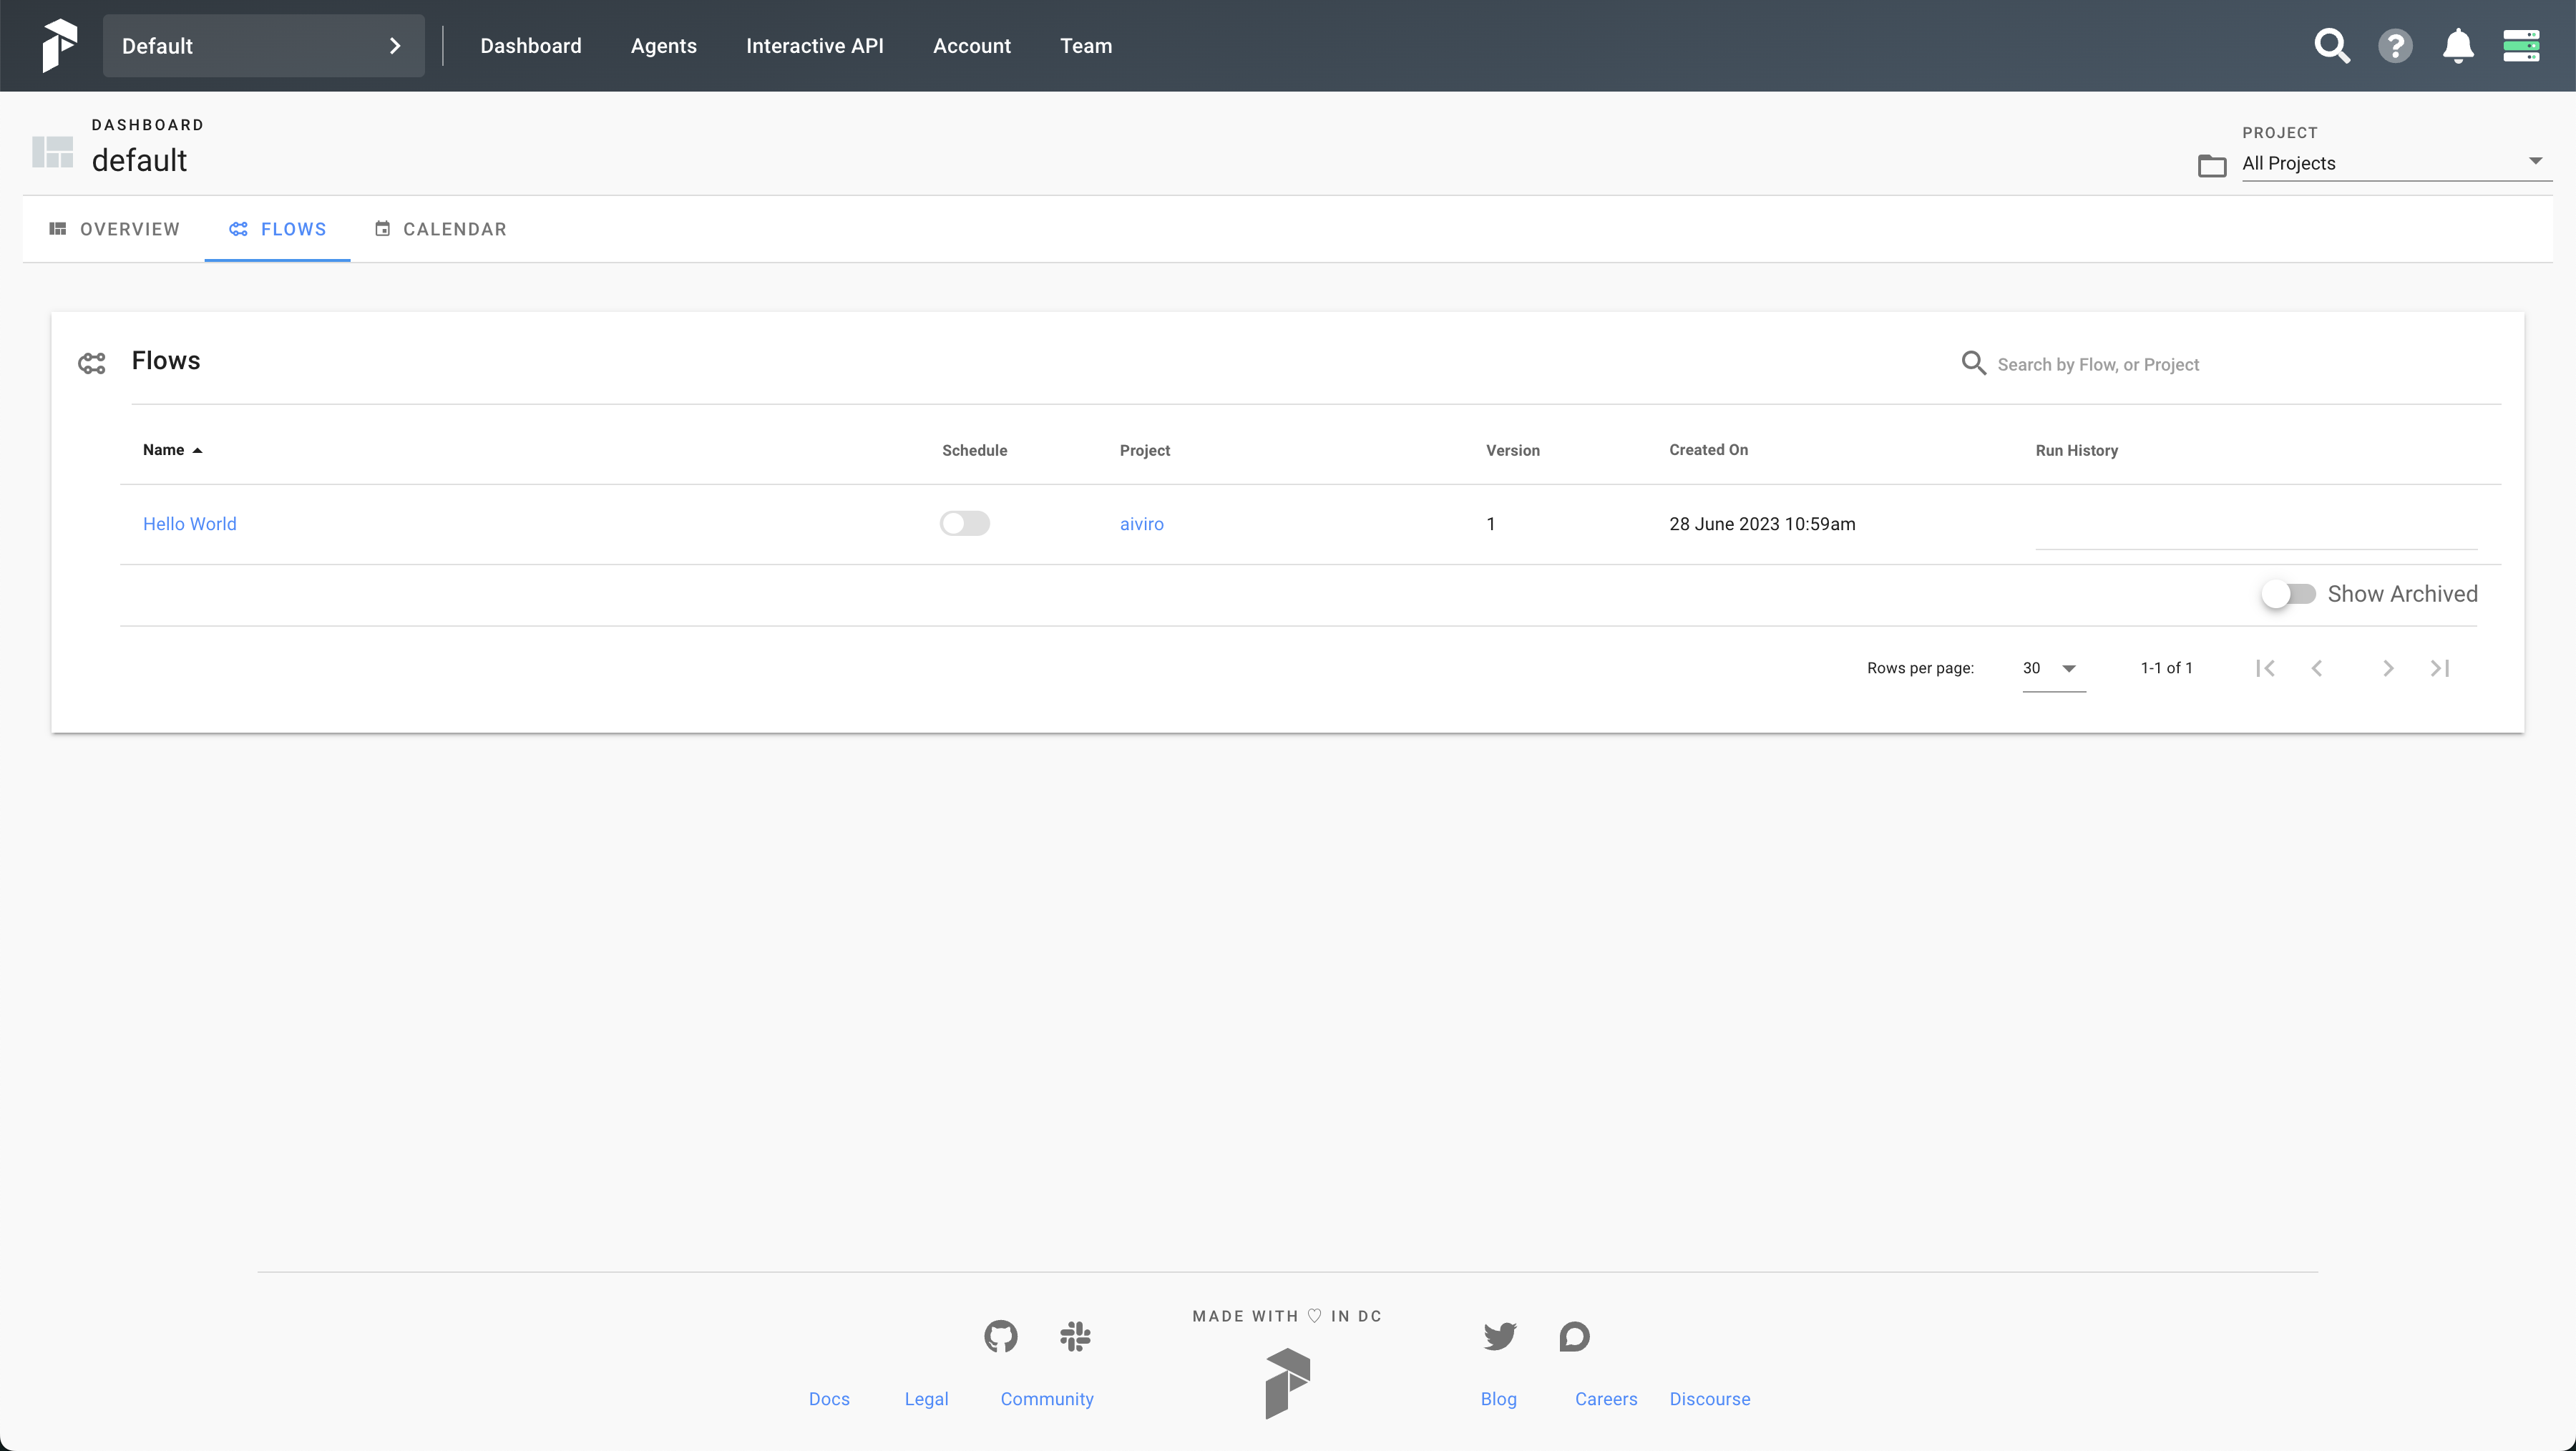
Web interface with selected Flow tab
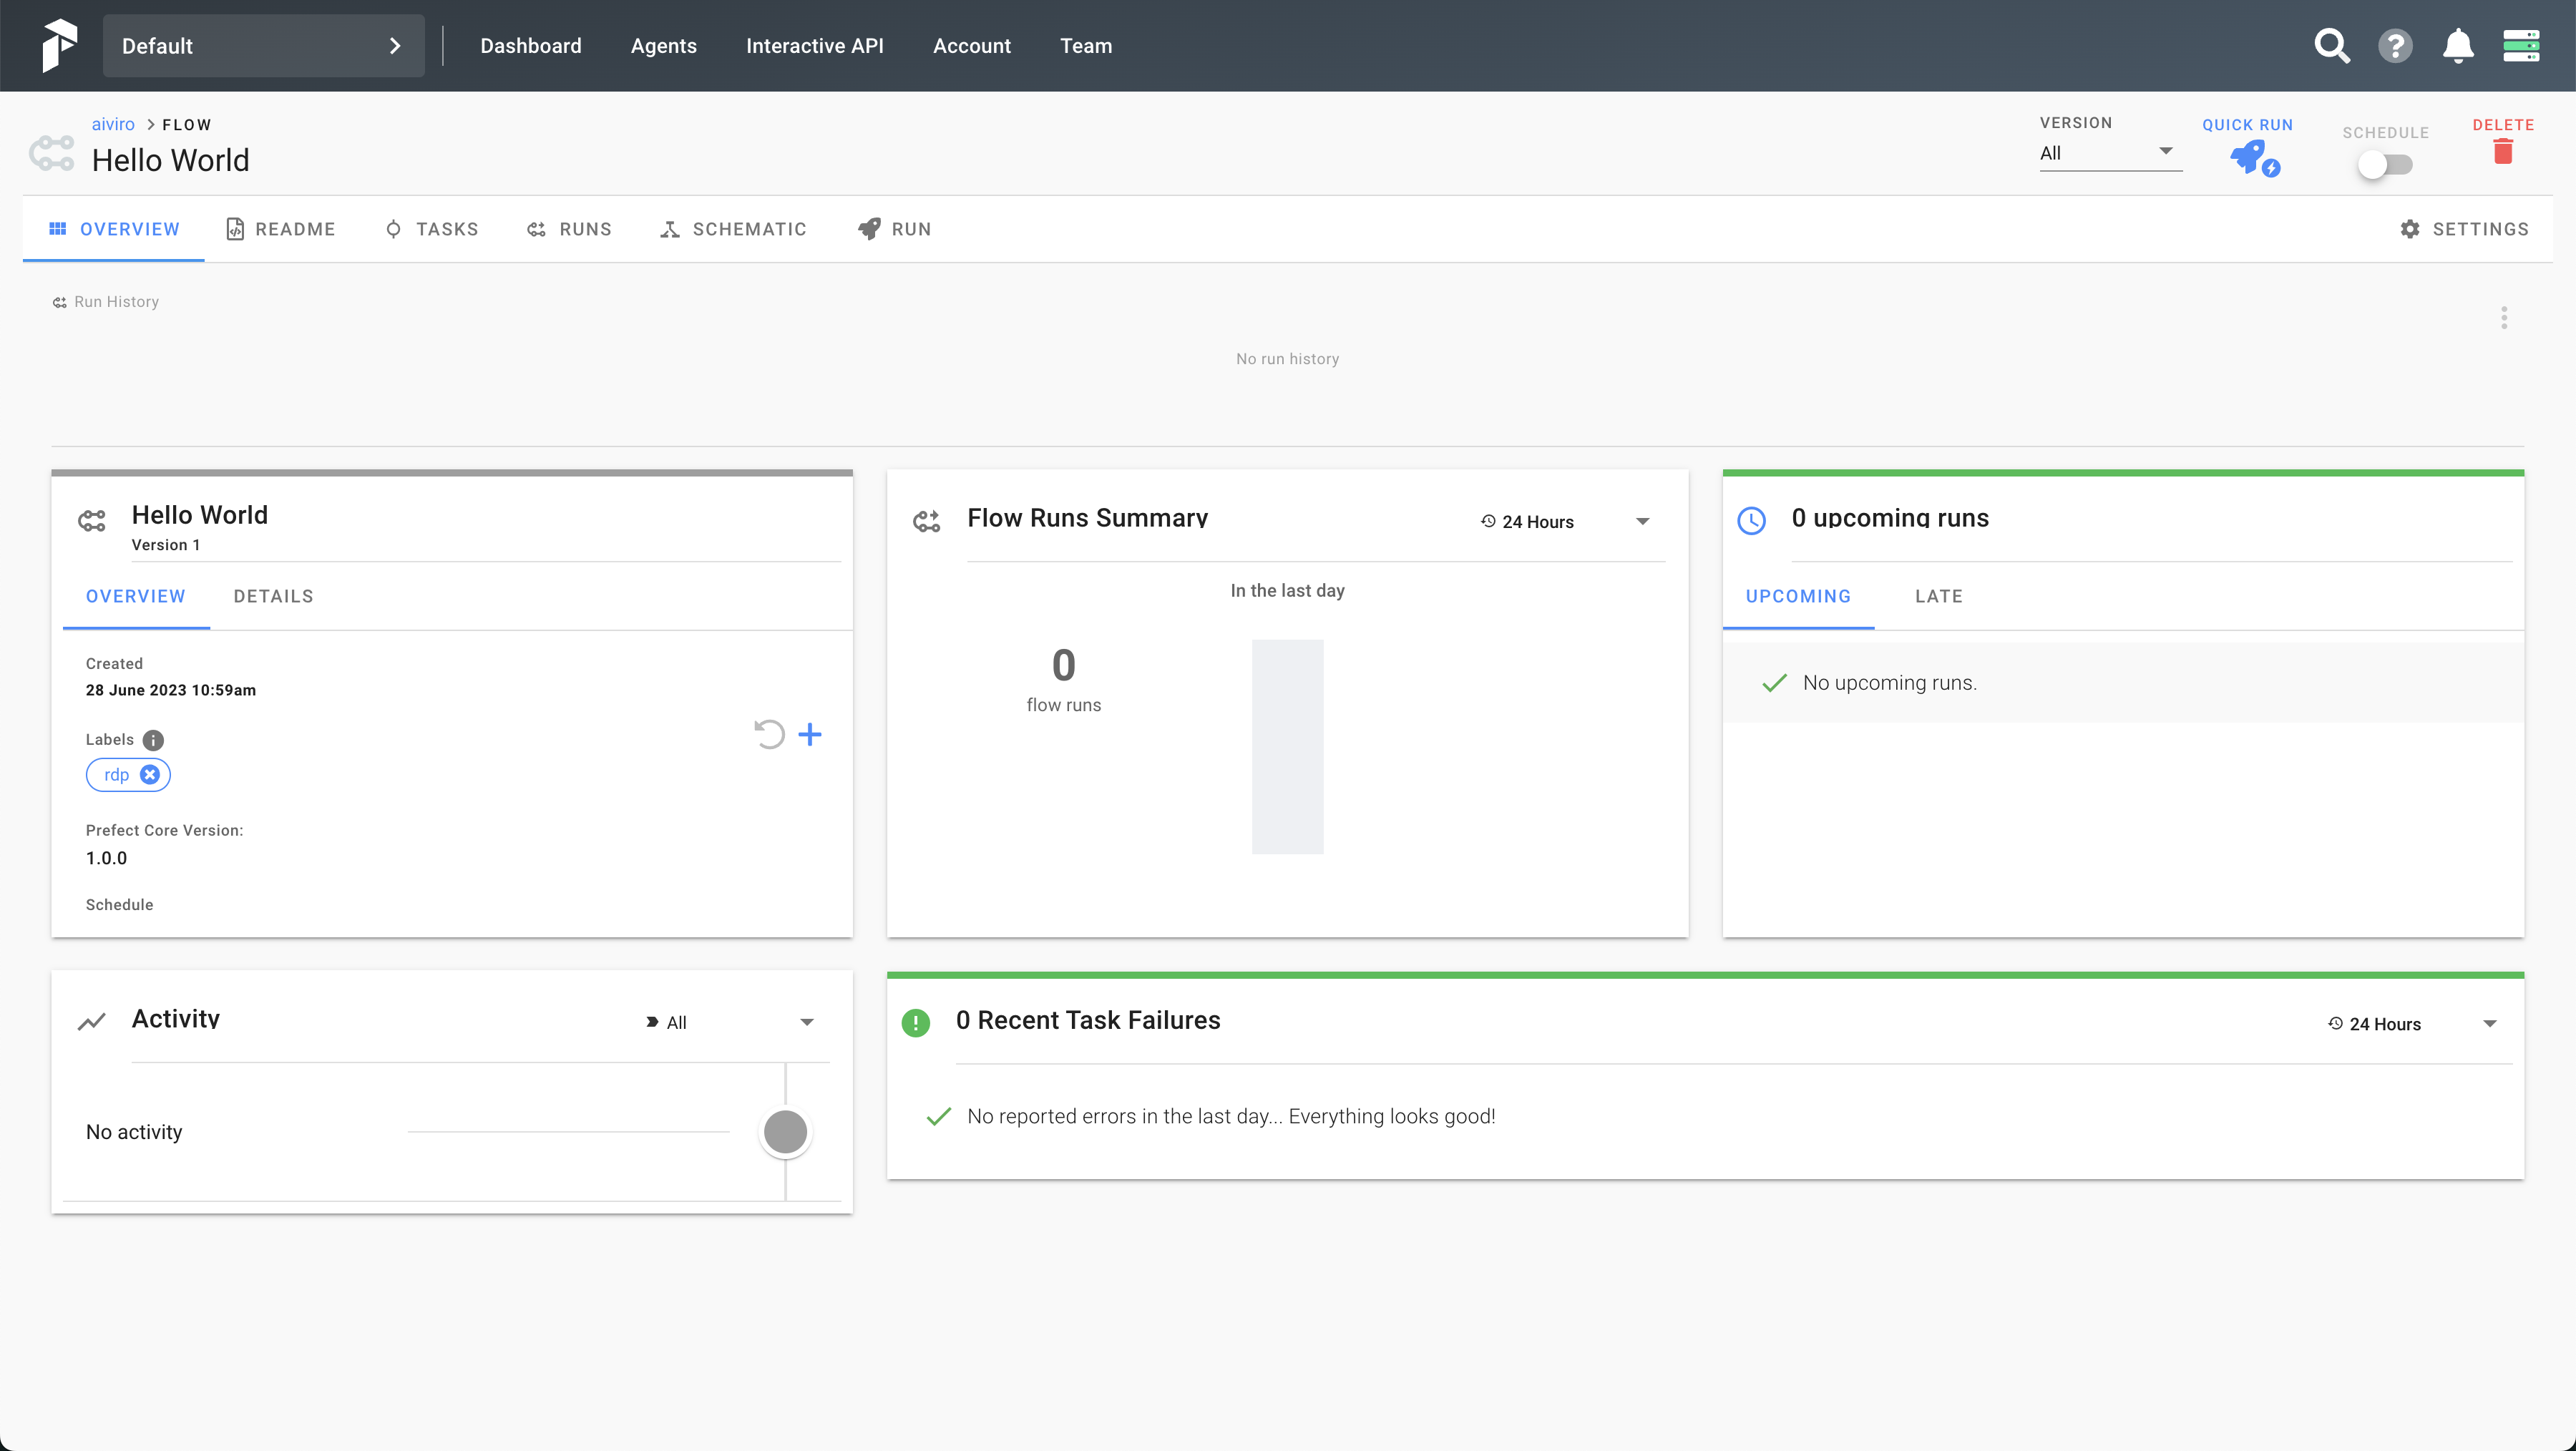
Detailed view of the Hello World flow
To stop agent and server, use the following commands. You must be in the same directory where you deployed them.
# stop agent
aiviro-cli deploy agent stop --agent-name <your-agent-name>

# stop server
aiviro-cli deploy server stop
Prefect V3
Successful deployment
Now you should be able to see deployed server at http://localhost:4200 or http://127.0.0.1:4200/. And see and active worker in the web interface (http://localhost:4200/work-pools).
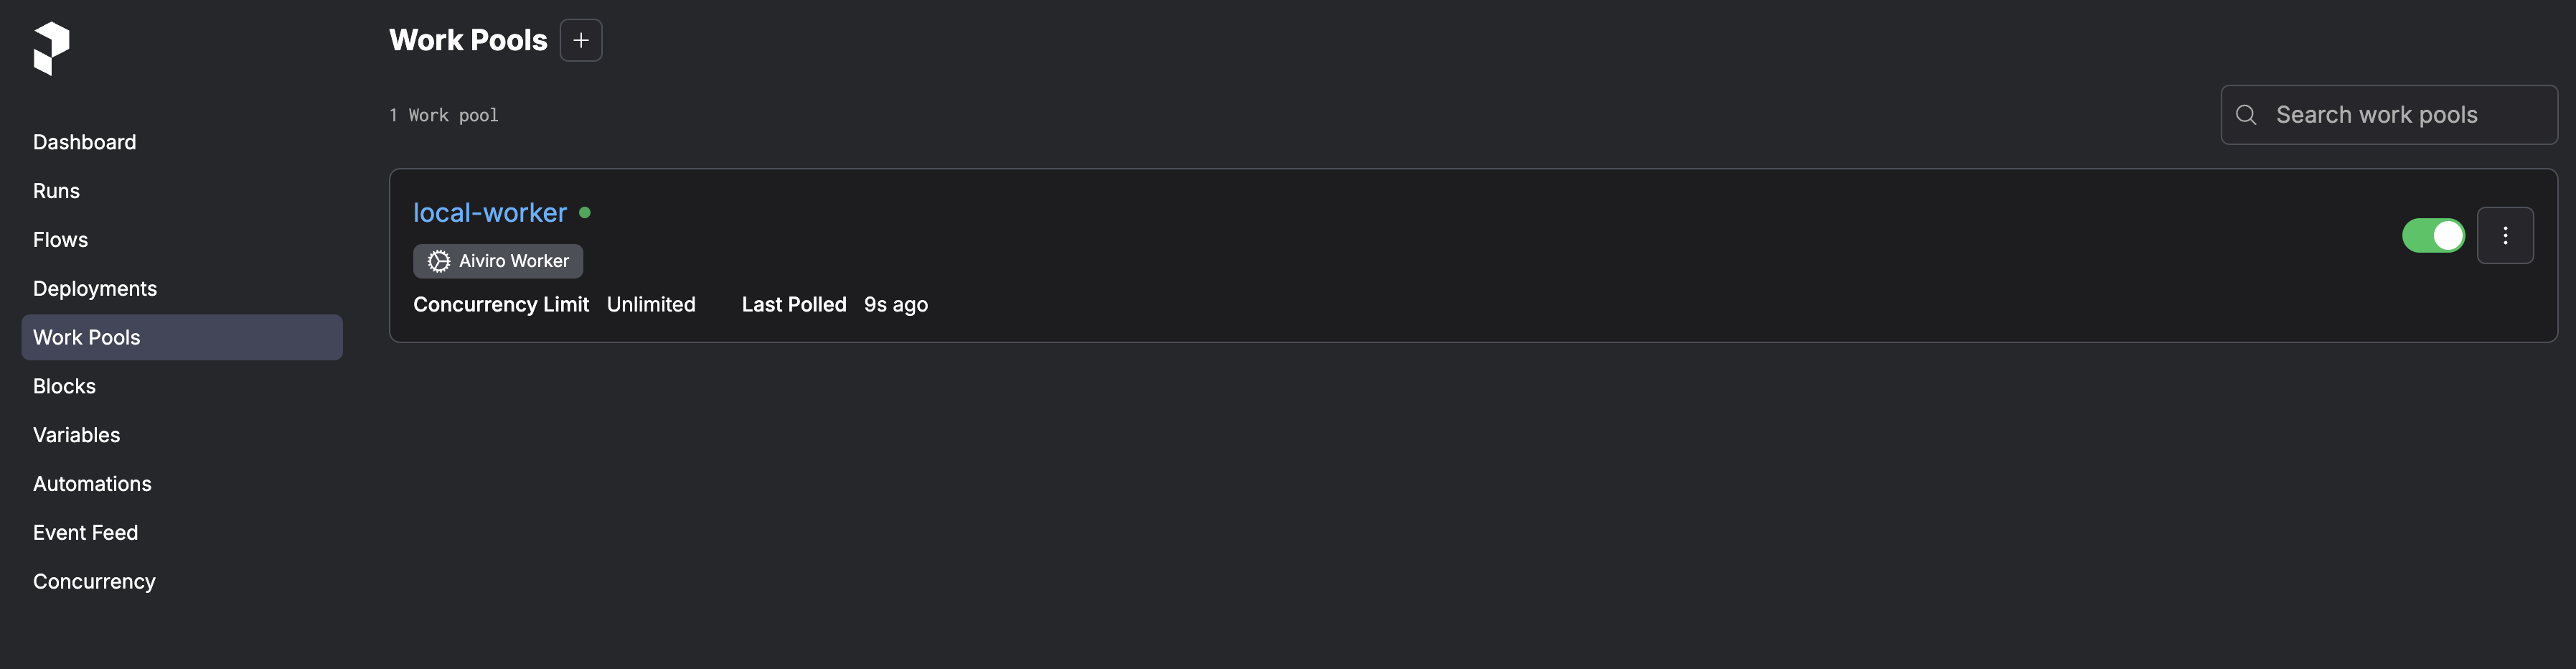
Deployed Aiviro server with active worker & work pool.
Operating the installation by hand
This applies to the Windows Installer deployment. The server and worker run as Windows services and manage themselves, so day-to-day operation needs no manual steps. When you do need to operate on the installation directly — for example to pull the latest flows or talk to the Prefect server from the CLI — activate the bundled environment first.
Activation works like a Python virtual-environment activate: it puts the
embedded Python and Git on your PATH and exports the same environment
variables the services use (PREFECT_HOME, PREFECT_API_URL,
GIT_REPOSITORY_PATH, the licence/config paths, and PYTHONPATH prepended
with the flow repository). Nothing is installed system-wide, and your own
~/.gitconfig is left untouched.
Important
The data directory is locked down to administrators, so start the terminal as Administrator.
cd /d "%ProgramData%\AiviroOrchestration"
activate
Run activate by name — do not double-click activate.cmd.
Once activated the prompt is prefixed with (aiviro); run
deactivate when you are done.
cd "$env:ProgramData\AiviroOrchestration"
.\Activate.ps1
Once activated the prompt is prefixed with (aiviro); run
deactivate when you are done.
Note
If you see “running scripts is disabled on this system”, allow scripts for the current session only and re-run:
Set-ExecutionPolicy -Scope Process -ExecutionPolicy Bypass
.\Activate.ps1
Once activated you can, for example, pull the latest flows or inspect the Prefect server:
git -C "%GIT_REPOSITORY_PATH%" pull
python -m prefect deployment ls
Registering Flow
Before a flow can be run by the Prefect server, it must be registered as a Deployment.
What’s the difference between a Flow and a Deployment?
A Flow is your core automation logic, defined in your Python script (e.g., the function decorated with
@flow).A Deployment is a server-side configuration for that flow. It bundles the flow with specific settings, such as a schedule (e.g., a cron string), default parameters, a specific work queue, or the git branch to pull code from.
You can have multiple deployments for a single flow.
For example, you might have one deployment that runs your finance robot daily on the prod-env queue, and a second deployment for the same flow that runs on demand on the test-env queue.
How to Register a Deployment
Registering a deployment is done by simply running your Python flow script from an environment that can access the Prefect server’s API.
This process is the same whether your server is running in Docker or as a local Python process.
As long as your local machine (e.g., your IDE or terminal) has network connectivity to the server (e.g., at http://localhost:4200), running the script will register the deployment via an API call.
The recommended way is to activate the bundled environment and run the
flow script with it — activation sets PREFECT_API_URL and puts the
embedded Python on your PATH, so registering a flow is the same as in
the Python tab.
Important
The flow repository lives under the data directory, which is only accessible with Administrator privileges, so start the terminal as Administrator.
Activate the environment (see Operating the installation by hand) and step into the flow repository:
cd /d "%ProgramData%\AiviroOrchestration"
activate
cd /d "%GIT_REPOSITORY_PATH%"
Run the script containing your flow with the activated Python:
python flows\<your-flow-script>.py
Note
If you would rather not activate, register-flow.cmd in the data
directory is a self-contained alternative — it configures the same
environment for a single command:
cd /d "%ProgramData%\AiviroOrchestration"
register-flow.cmd "git-repo\flows\<your-flow-script>.py"
Once the script finishes, your flow is registered. You can see it in the Prefect UI under the Deployments tab, where it is now ready to be run.

The Prefect UI showing the newly registered deployment on the Deployments page.
Ensure you are in your local project directory and your Python virtual environment is activated.
Run the script containing your flow.
(venv) python flows/<your-flow-script>.py
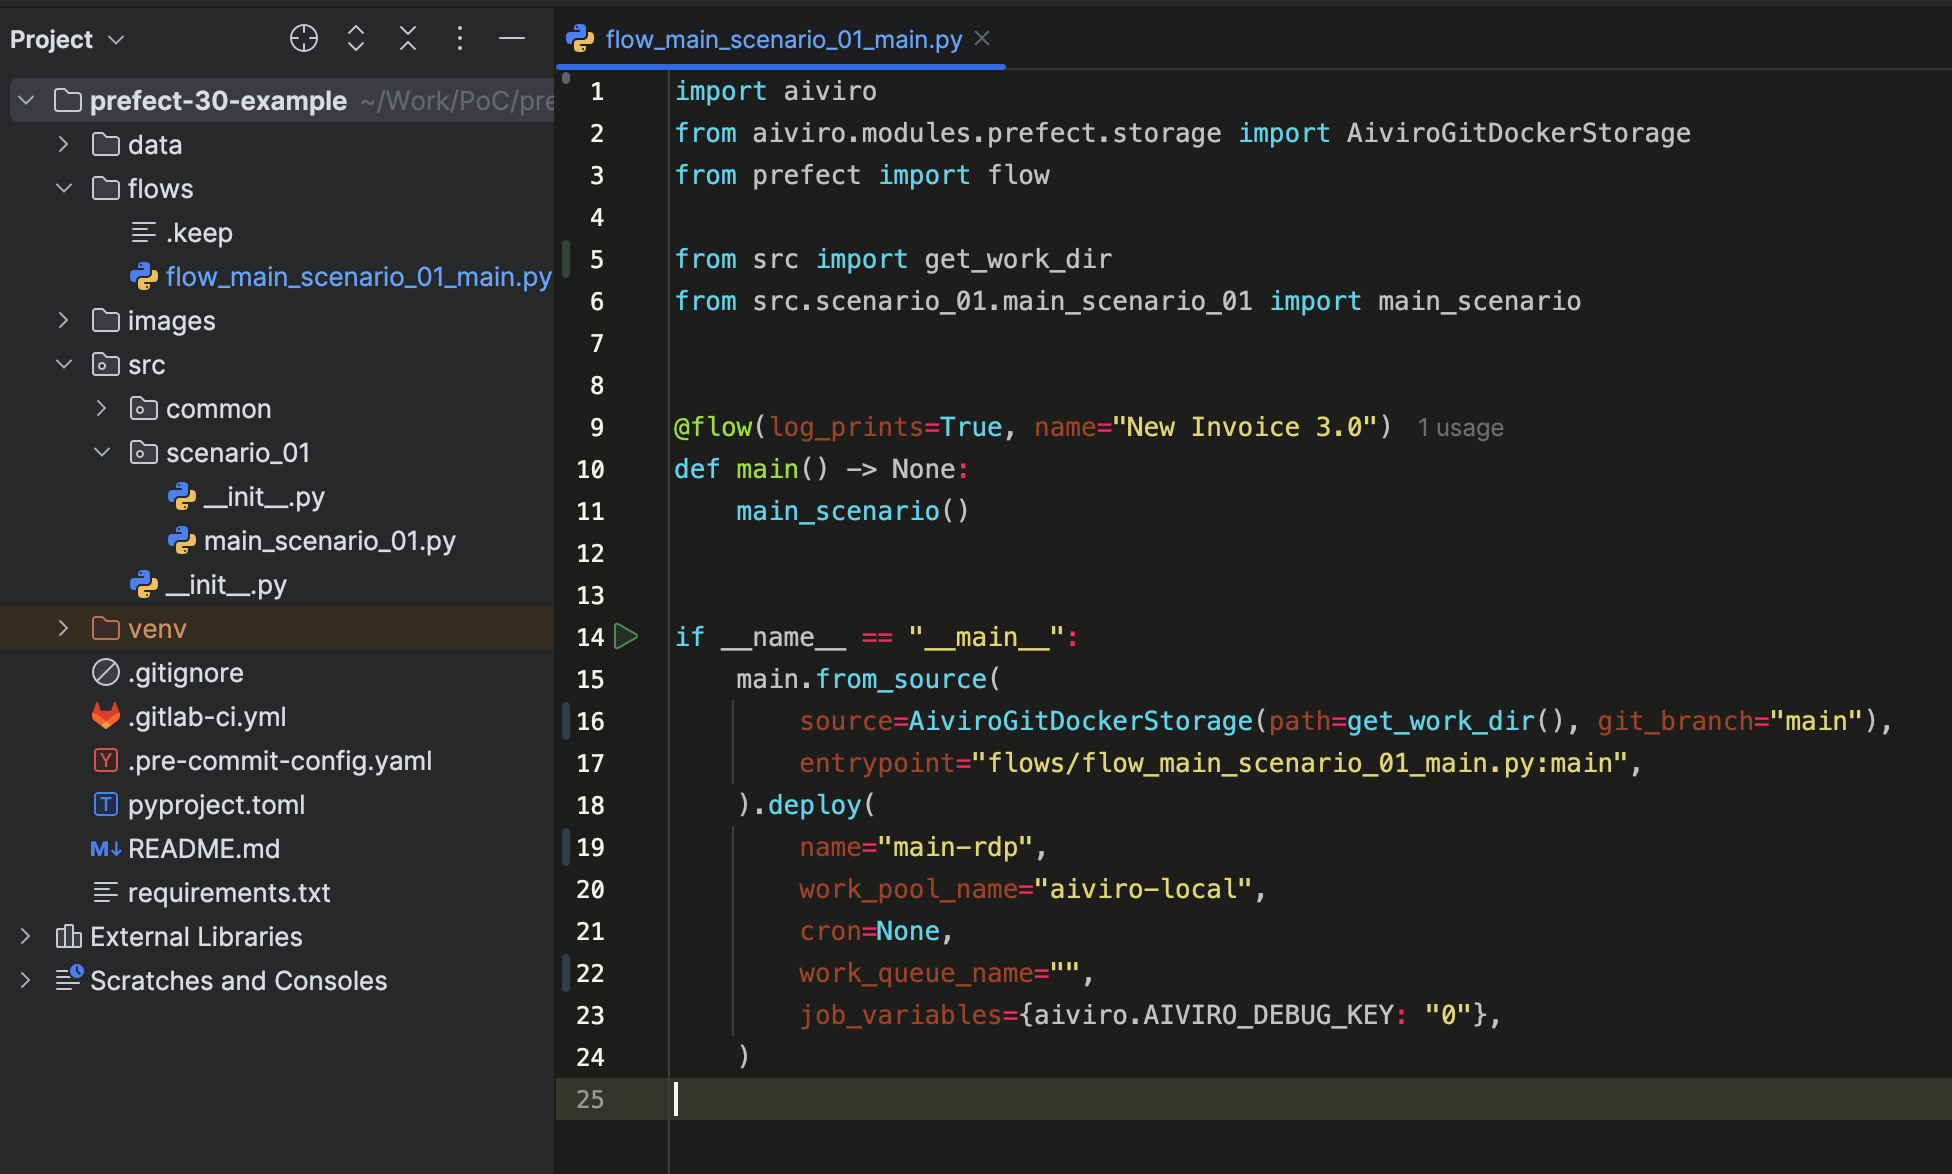
Running the flow script from an IDE like PyCharm will register the deployment.
Once the script finishes, your flow is registered. You can see it in the Prefect UI under the Deployments tab, where it is now ready to be run.
The Prefect UI showing the newly registered deployment on the Deployments page.
Work Pool & Work Queue
In Prefect, Work Pools and Work Queues are the core components for managing flow run execution. For detailed definitions, please refer to the Prefect Work Pools & Queues.
A Work Pool organizes work for workers. In our setup, we use a
Processwork pool (e.g.,aiviro-local), which ouraiviro-workerinstances connect to.A Work Queue lives inside a work pool and is the specific “lane” that a worker polls for flow runs. Queues also support priority, allowing you to control which runs are picked up first.
Our primary use case for custom work queues is to manage distinct execution environments and prevent resource contention.
For example, if you have two separate Windows machines where robots connect, you can create a separate queue for each one (e.g., vm-01 and vm-02).
Note
There’s a default queue named default that is created automatically and has a concurrency limit of 1, so in most cases, you won’t need to create additional queues.
You can create a new work queue for your existing work pool using either the Prefect UI or the CLI.
Navigate to your Prefect UI (e.g.,
http://localhost:4200).Go to the Work Pools page from the left-hand menu.
Click on the name of the work pool you want to add a queue to (e.g.,
aiviro-local).Go to the Work Queues tab, and click the
+button to create a new work queue.Fill in the name (e.g.,
prod-env-1) and set the Concurrency Limit. The default is unlimited.
Make sure your Prefect server is running and your terminal is active in the same Python virtual environment.
Identify your Work Pool name (e.g.,
aiviro-local).Run the following command to create a new queue.
# Creates "prod-env-1" in the "aiviro-local" pool with the default limit of 1
(venv) prefect work-queue create "shared-env-1" --pool "aiviro-local" --limit 1
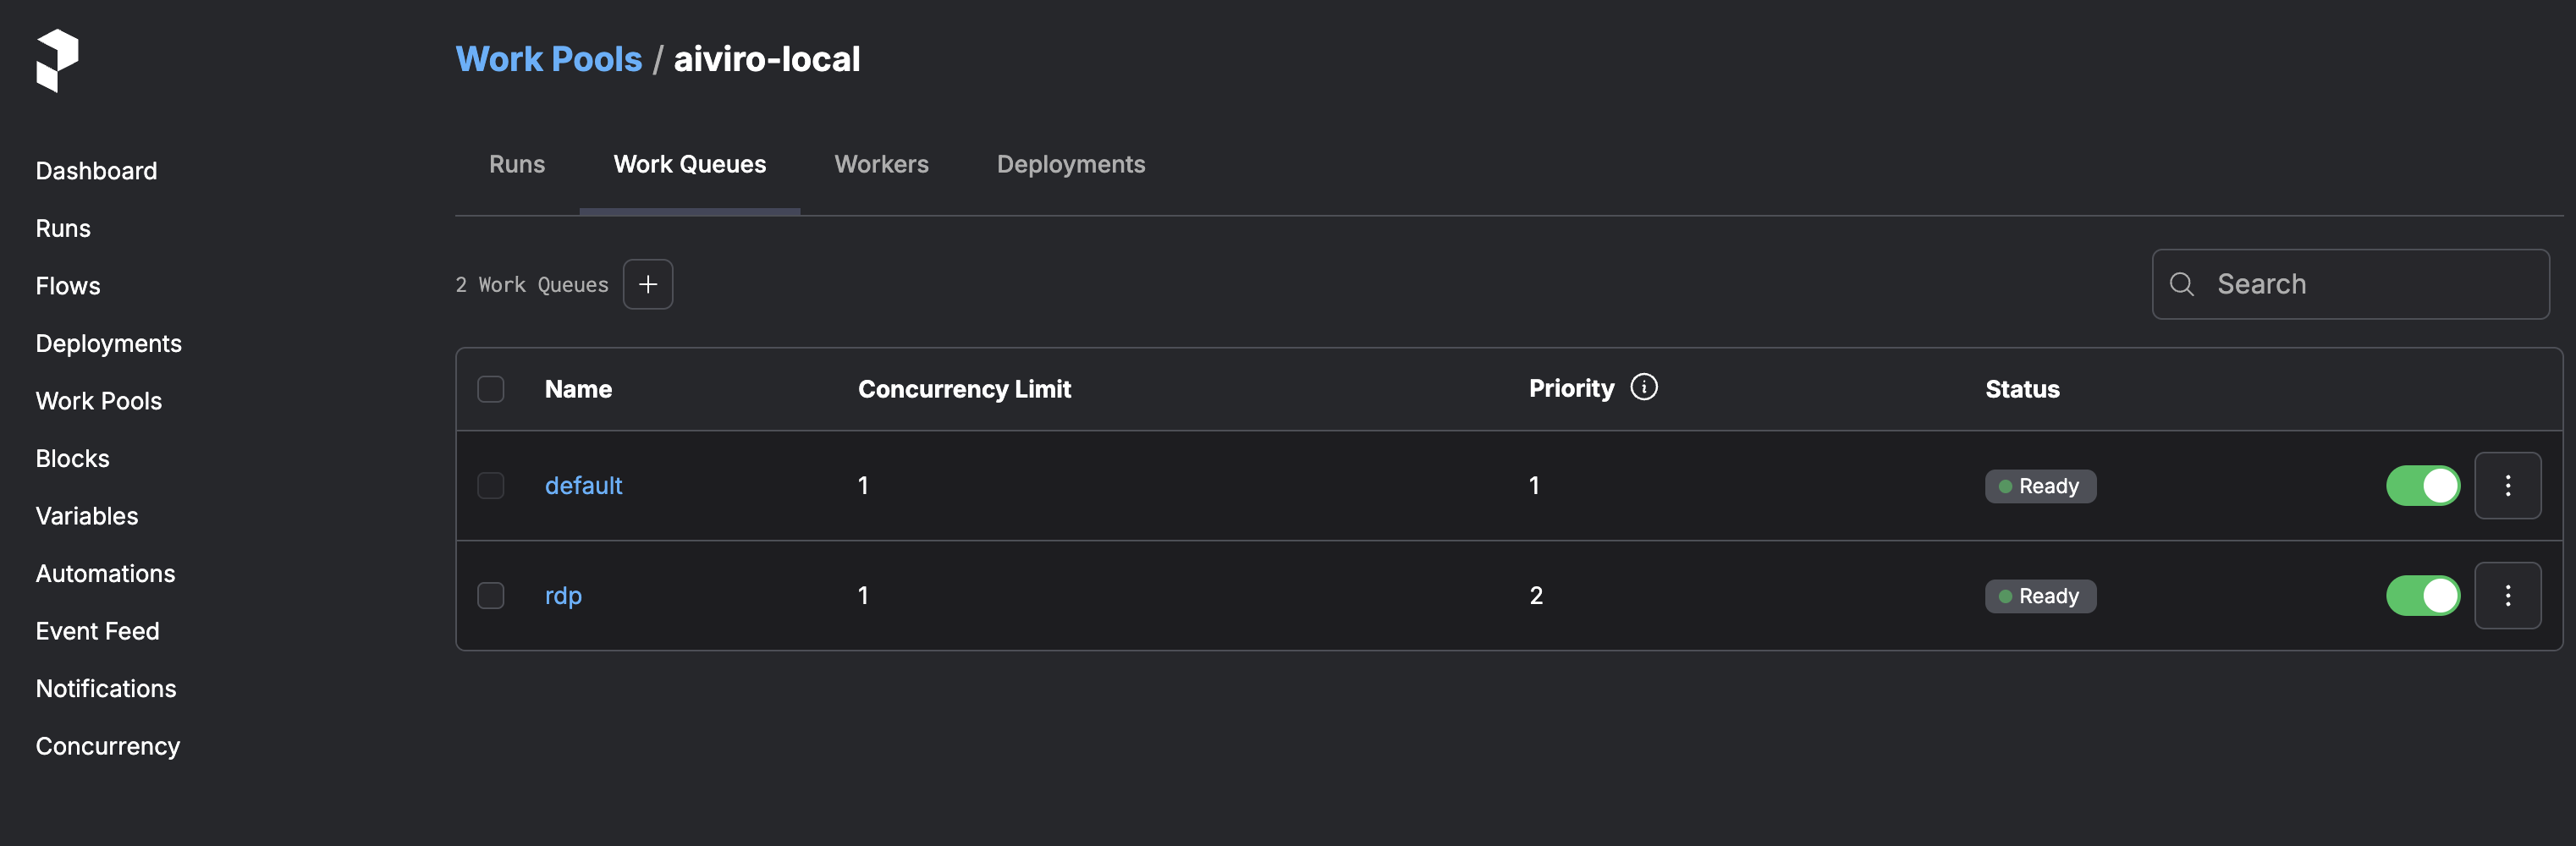
The Prefect UI showing the newly created work queue on the Work Queues page.
Initialization Scripts
When deploying agent or worker as docker containers, you can add custom initialization scripts that will run when the worker container starts. These scripts run before the main worker process starts, allowing you to perform custom setup or configuration.
To add custom initialization scripts:
Create a shell script with the
.shextensionMake the script executable (
chmod +x your-script.sh)Place the script in the
prefect-data/<worker-name>/init.d/directory
Note
Scripts are executed in alphabetical order
Scripts must have execute permissions
Scripts must use the
.shextensionThe script execution happens before the worker starts but after the container’s environment variables are set
CI/CD Integration
Since Aiviro scenarios are standard Python scripts, they can be easily integrated into any CI/CD pipeline (like GitLab CI or GitHub Actions) for automated testing. You can structure your tests using a standard Python testing framework like pytest.
A typical CI/CD job would involve:
Setting up a Python environment in your pipeline runner.
Installing Aiviro, pytest, and any other project dependencies.
Running your test suite (e.g., by calling the
pytestcommand).
Here is a minimal example of a .gitlab-ci.yml job that runs pytest:
test_scenarios:
  image: python:3.11  # Use an appropriate Python image
  stage: test
  script:
    # Install dependencies
    - pip install -i https://pypi.aiviro.com aiviro[rdp]
    - pip install pytest
    - pip install -r requirements.txt  # If you have other dependencies

    # Run the tests
    - pytest
In this setup, your pytest tests would import and execute your Aiviro scenarios to check for failures or specific outcomes.
Prefect V1
Successful deployment
Successful deployment will look like this, you can check all running docker containers by running docker ps command.

Running docker containers
Register Flow
The deployed agent contains your git repository and therefore also your flows. However, you need to register them in the deployed environment, so that you can run them from the web interface. Follow these steps to register your flow:
# connect to the linux server
ssh <your-username>@<your-server-ip>
# enter the agent container
docker exec -it <agent-container-name> /bin/bash
# navigate to git repository directory
cd git-repo/
# register your flow
python flows/<your-flow-script>.py
Successful registration of the flow will look similar to this:

Successful flow registration
Update Agent
To update the agent, you have two options (soft and hard one). First step is always the same, you need to firstly stop the agent.
Warning
Keep in mind that by stopping or restarting any docker-container you’ll lose all temporary data stored in it. The initial state of the docker-container is defined by the image it was created from.
The soft way to update the agent is to start it using already existing .env file with the --update option:
aiviro-cli deploy agent start-env --agent-name <your-agent-name> --update
Logs Explorer
With server deployment, you can deploy additional service called Explorer, which is a web application for exploring logs and metadata. For more information, see Explorer section. It’s required to have the agent deployed and running in order to use the Explorer.
# deploying explorer with the default settings
aiviro-cli deploy explorer start --logs prefect-data/ --detach

# for information about custom deployment of the explorer, use --help option
aiviro-cli deploy explorer start --help